![]()
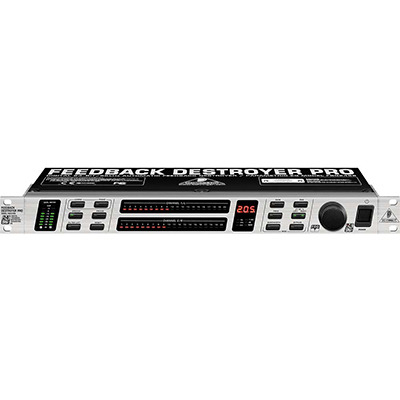
1.)LEVEL METER- lets you monitor the input level.Eight LED'S are available per channel.If the Clip LED lights up,digital distortion may occur on FBQ2496's input.In this case,reduce the input level.
2.)LEARN BUTTON-A quick tap on the LEARN button (LED lights up) gets you into the LEARN mode.
3.)PANIC-If unexpected feedback starts occuring during a performance,pressing the PANIC button can help.As long as the button is kept pressed (for a maximum of 1 second),your FBQ2496 rapidly searches for feedback frequencies and suppresses them.
4.)SPEECH-Pressing the button increses the sensitivity of feedback supression;the FBQ2496 recognizes critical frequencies sooner and deploys a filter that cuts in appropriately.
5.)FREEZE-Once a particularly good FBQ2496 setting is achieved,you can keep this setting by pressing the FREEZE button.
6.)FILTER LIFT-The so-called "Filter Lifting Time"informs you about how long an adjusted automatic filter can remain inactive before its values are reset again.
7.)RESET-If you brieftly press the RESET button all automatically set filters are erased as well.
8.)STATUS DISPLAY-The FBQ2496 features a total of 40 filters i.e 20 filters per channel.
9.)LED DISPLAY-Three -digit numeric diplay indicates the absolute value of the parameter you are modifying.
10)GAIN-In the PEQ mode,the GAIN button lets you adjust filter gain in dB (from +15 dB to -15dB in 0.5-dB increments and from -16 dB to -36 dB increments.)The dB value set using the wheel is shown in the display.
11.)PEQ-After keeping the PEQ button pressed for a few moments (the LED on the PEQ button links),use the wheel to set the number of parametric filters.
12.)FREQUENCY-When the FBQ2496 is in the PEQ mode (the LED on the PEQ button is lit),the mid frequency of each individual filter can be set.
13.)LEFT-RIGHT -The LEFT-RIGHT button lets you select the channels you wish to edit.
14.)BANDWIDTH-This button to set the bandwidth of the selected parametric filter.
15.)BYPASS-Keeping the BYPASS button pressed for a few moments activates the hard bypass.
16.)MIDI-Simultaneously pressing BANDWIDTH and BYPASS gets you into the MIDI menu.
17.)WHEEL-is a continuous rotary control.Use it to make adjustments to the selected parameter.
18.)POWER-Press POWER to turn on your FEEDBACK DESTROYER PRO.
19.)The mains connection is established using a cable with an IEC mains connector.An appropriate mains cable is included.
20.)You can replace fuses at the FUSE SWITCH of the FBQ2496.
21.)SERIAL NUMBER.
22.)The FBQ2496 features a complete set of MIDI functions.
23.)Use the OPERATING LEVEL switch to change from home recording level (-10 dBV) to studio level (+4 dBU) and vice versa.
24.)INPUT LEFT/RIGHT -These are the balanced input of your FBQ2496.The are laid out as 1/4" TRS and XLR connectors
25.)OUTPUT LEFT/RIGHT-Both of the FBQ2496 outputs are also laid out as balanced 1/4"TRS and XLR connectors.
![]()
Specifications:
![]()
Sample Applications:
![]()